It took me more than 3 hours to lay down the grey paint. Catch was to carefully paint around the preshaded areas, while at the time, paint was applied by mottling it on, creating uneven layers, giving the overall appearance of a worn look. It’s also interesting, that the aircraft I am building, has nose radome of a lighter color than tail dielectric paneling.
You have probably noticed lately, that the photos on my blog got pretty small and if you could click on them before, to get the full size, it isn’t so anymore. This happened with some WordPress update a while ago and I haven’t figured it out how to prevent this, yet. Therefore, I’ve decided to post a gallery format instead. Each photo is captioned and you just need to click on the first photo and then continue by either pressing the > sign on the right or pressing the Right Arrow cursor on your keyboard – oh and the photos are bigger than before as well!
Now let’s put some color on the big Mig!!!
First, the model was primed with darkened Mr.Surfacer 1000.
This was followed by a preshading with a dark Grey paint. Unlike the standard ‘black all over the panel lines’ method, I restrained myself and used it only on parts, that show on the reference photos. Luckily, there’s plenty of these of the Red 37.
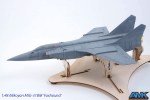
A coat of Grey. ‘Traffic Grey’ by Mr.Paint (MRP-189) was used. It was the first time, I’ve used Mr.Paint paint for the whole aircraft and all I can say is I am IMPRESSED! I was doubtful at the beginning, as the paints aren’t cheap and as they come pre-thinned for airbrush use, I was affraid one bottle won’t be enough. At the end, I only used half a bottle on a big, single colour paint scheme! I think I will be switching from enamels to Mr.Paint from now on.
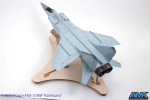
It took me more than 3 hours to lay down the grey paint. Catch was to carefully paint around the preshaded areas, while at the time, paint was applied by mottling it on, creating uneven layers, giving the overall appearance of a worn look. It’s also interesting, that the aircraft I am building, has nose radome of a lighter color than tail dielectric paneling.
It took me more than 3 hours to lay down the grey paint. Catch was to carefully paint around the preshaded areas, while at the time, paint was applied by mottling it on, creating uneven layers, giving the overall appearance of a worn look. It’s also interesting, that the aircraft I am building, has nose radome of a lighter color than tail dielectric paneling.
It took me more than 3 hours to lay down the grey paint. Catch was to carefully paint around the preshaded areas, while at the time, paint was applied by mottling it on, creating uneven layers, giving the overall appearance of a worn look. It’s also interesting, that the aircraft I am building, has nose radome of a lighter color than tail dielectric paneling.
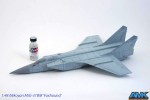
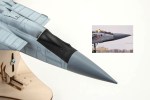
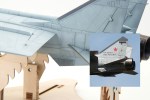
Radome discoloration – a lot of MiG-31s “suffer” from a radome discoloration on top of it. Unfortunately it doesn’t show well on the model photo because of the shine, but it’s there.
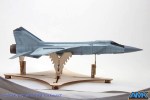
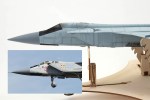
Patterns on the air intakes appear to be like Foxhound fingerprints very distinct, but different between airframes.
Patterns on the air intakes appear to be like Foxhound fingerprints very distinct, but different between airframes.
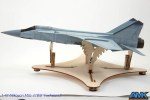
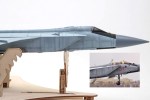
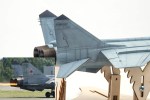
Dielectric panels on the ventral strakes also suffer from discoloration, while the tail units are similarly affected by weathering as are the intakes.
Dielectric panels on the ventral strakes also suffer from discoloration, while the tail units are similarly affected by weathering as are the intakes.
Your MiG looks magnificent, great job. Your blog is also very nice and informative. I also have a scale modeling blog at http://www.mmscalemodels.com, check it out.
Sebastijan, what are you planning on doing with the canopy? Mig 25 & 31’s have this pink/orange rubber around the glass. I’m about to start priming my model, but don’t have a clear plan on what I’m going to do about it. I’ve even considered not doing detail all together.
I plan on painting the sealant freehand, as it is done on real aircraft. I think the decals, that are planned by some aftermarket company and will be included in the B/BS boxing look a bit too uniform. Also take note, that the sealant is also applied on the intake-fuselage joints, on the intake RWR antennas, around the IRF probe and some other places as well.


Brilliant!!! Looks really great so far!!
Thanks Nicholas!
Your MiG looks magnificent, great job. Your blog is also very nice and informative. I also have a scale modeling blog at http://www.mmscalemodels.com, check it out.
Bets regards
Metodi
Hi Metodi! Thank you very much! I am a fan of your work, but didn’t know about your blog. I will add you to my links over the weekend!
Cheers!
Sebastijan
Thanks, appreciated!
Sebastijan, what are you planning on doing with the canopy? Mig 25 & 31’s have this pink/orange rubber around the glass. I’m about to start priming my model, but don’t have a clear plan on what I’m going to do about it. I’ve even considered not doing detail all together.
I plan on painting the sealant freehand, as it is done on real aircraft. I think the decals, that are planned by some aftermarket company and will be included in the B/BS boxing look a bit too uniform. Also take note, that the sealant is also applied on the intake-fuselage joints, on the intake RWR antennas, around the IRF probe and some other places as well.