
I was very intrigued when Clearprop announced their new tool MiG-23 kit in 1:72 and with its release in early April, I managed to get one at Moson show in Hungary. Since there’s very few builds or reviews that I’ve seen so far, I’ve decided to do a build review of the kit.
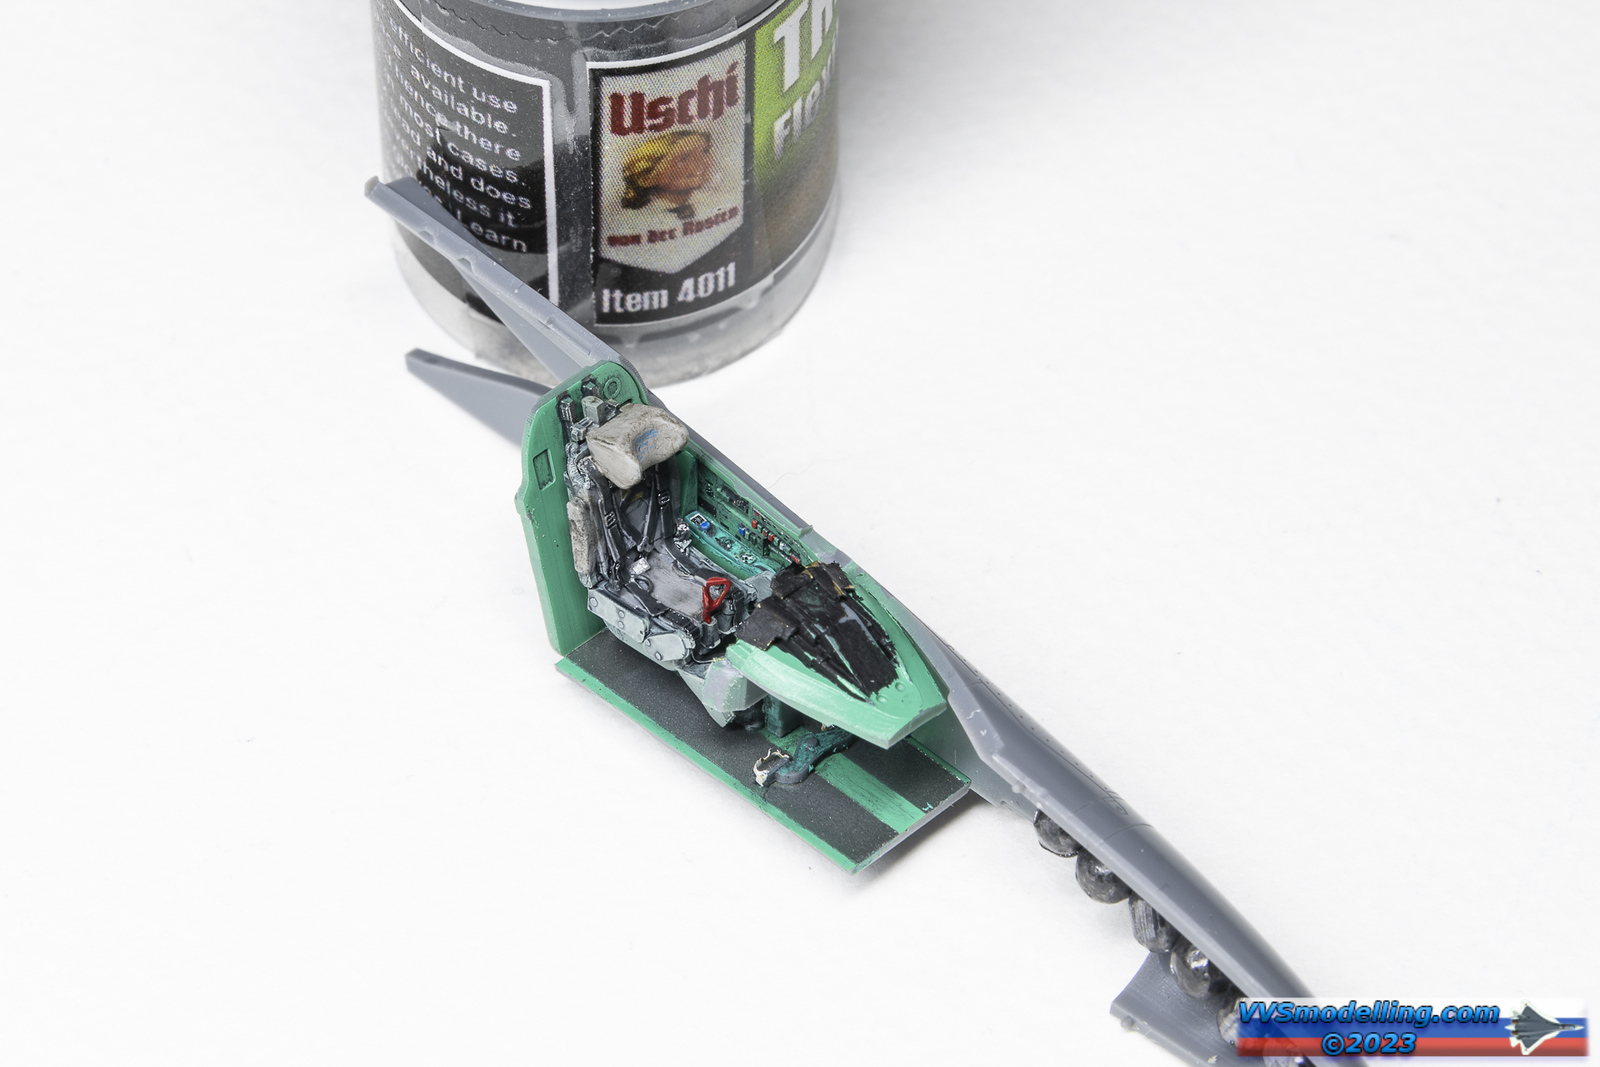
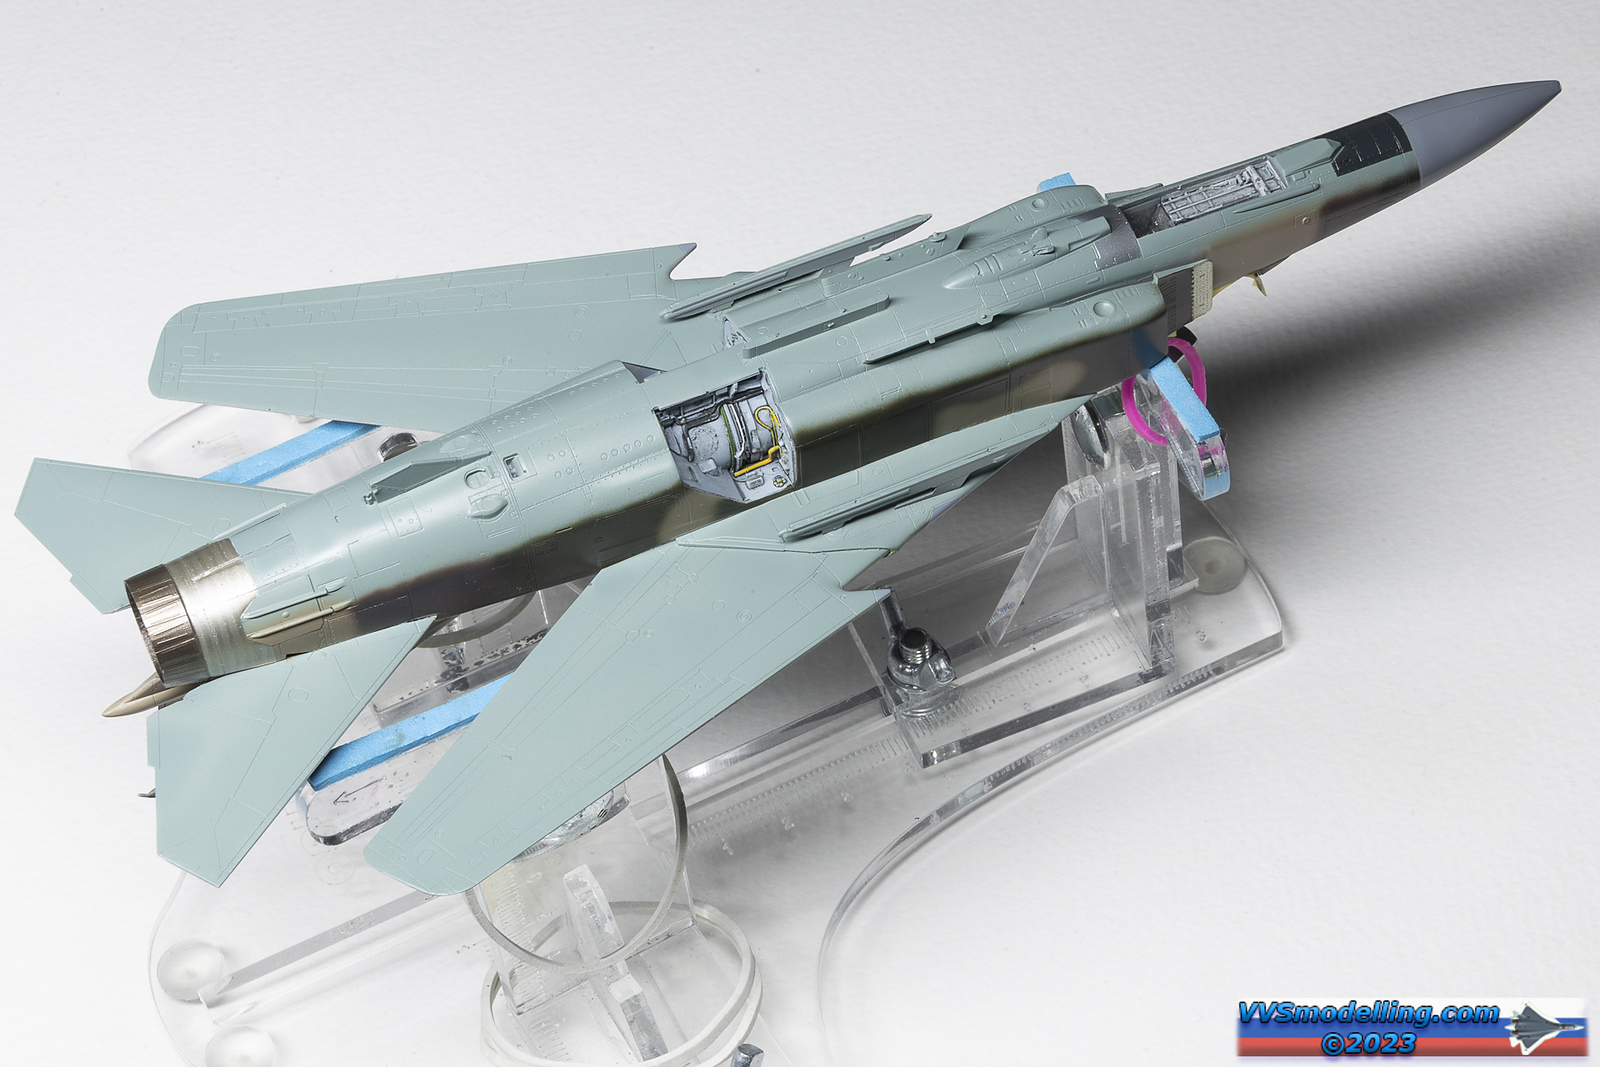
Starting with the cockpit, the kit uses a combination of Photo-etched and plastic parts combined with decals. It requires some time to build all the layers but the end result is a really cool looking and busy cockpit. For example – the instrument panel is a basic shape, to which you apply instrument faces decals then glue the PE framing over it and on top of that a second set of decals that cover all the various knobs, displays etc. And of course in the end, you add the tiny levers for gears etc. The only thing I add was the throttle handle, which is missing (there’s only a slightly embossed circle on the throttle quadrant).


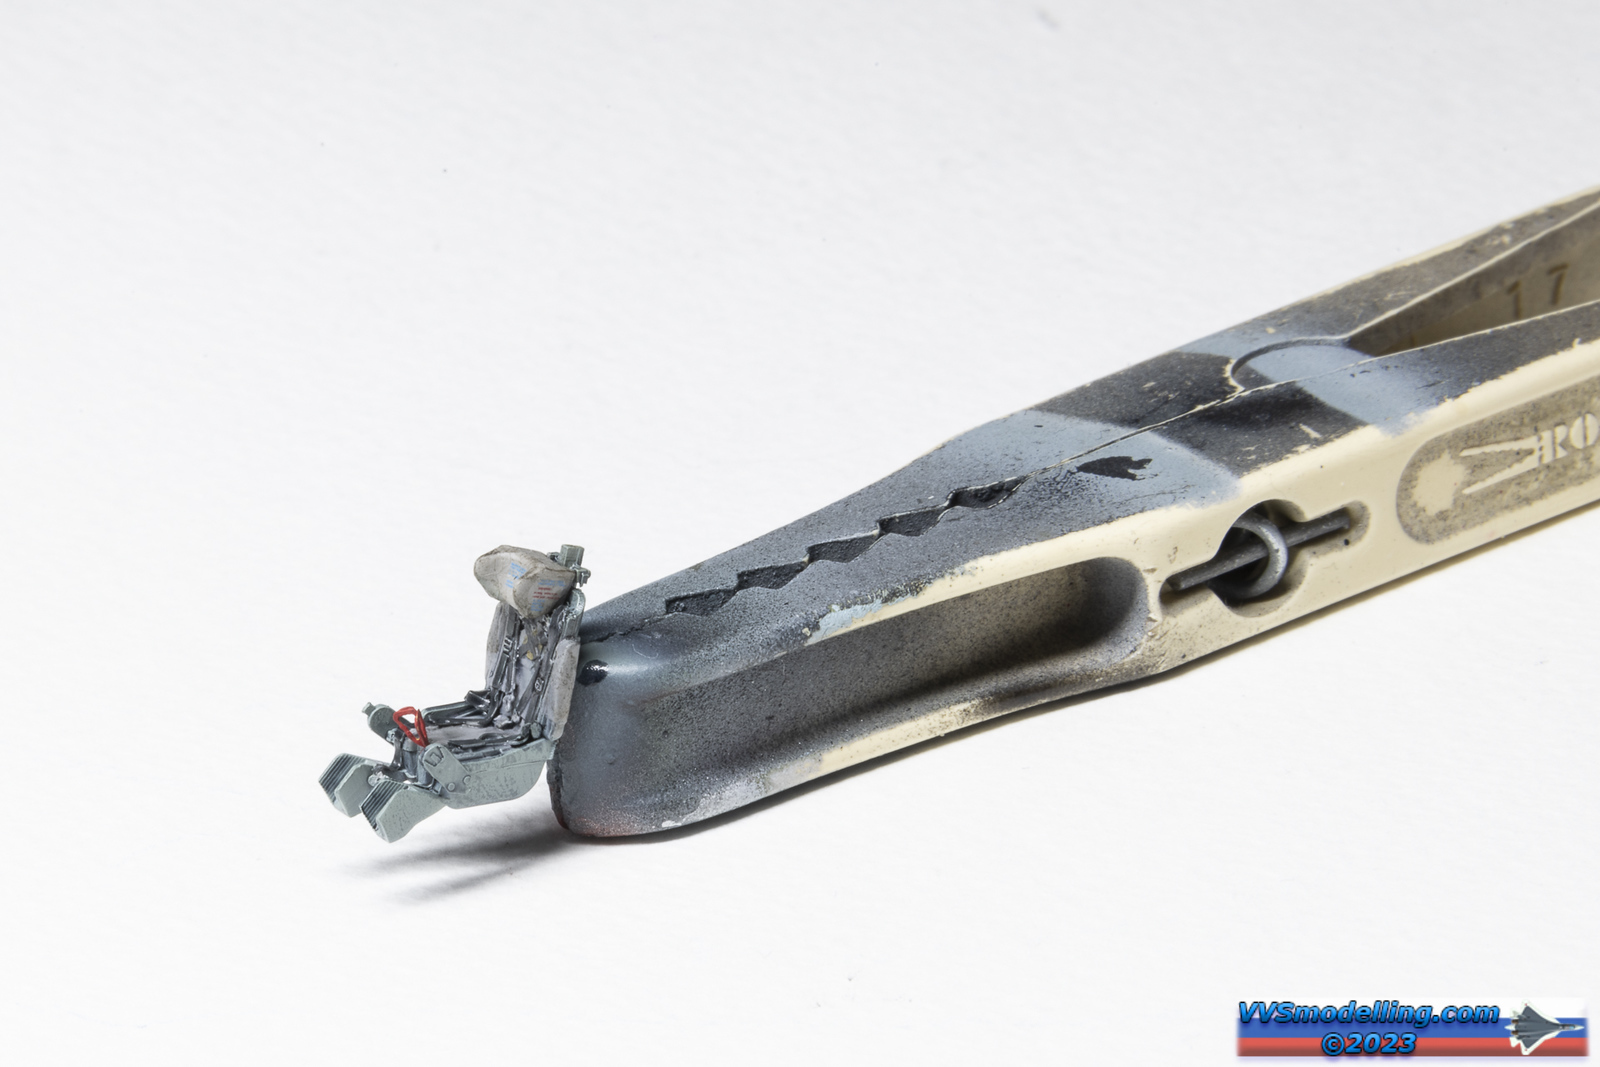
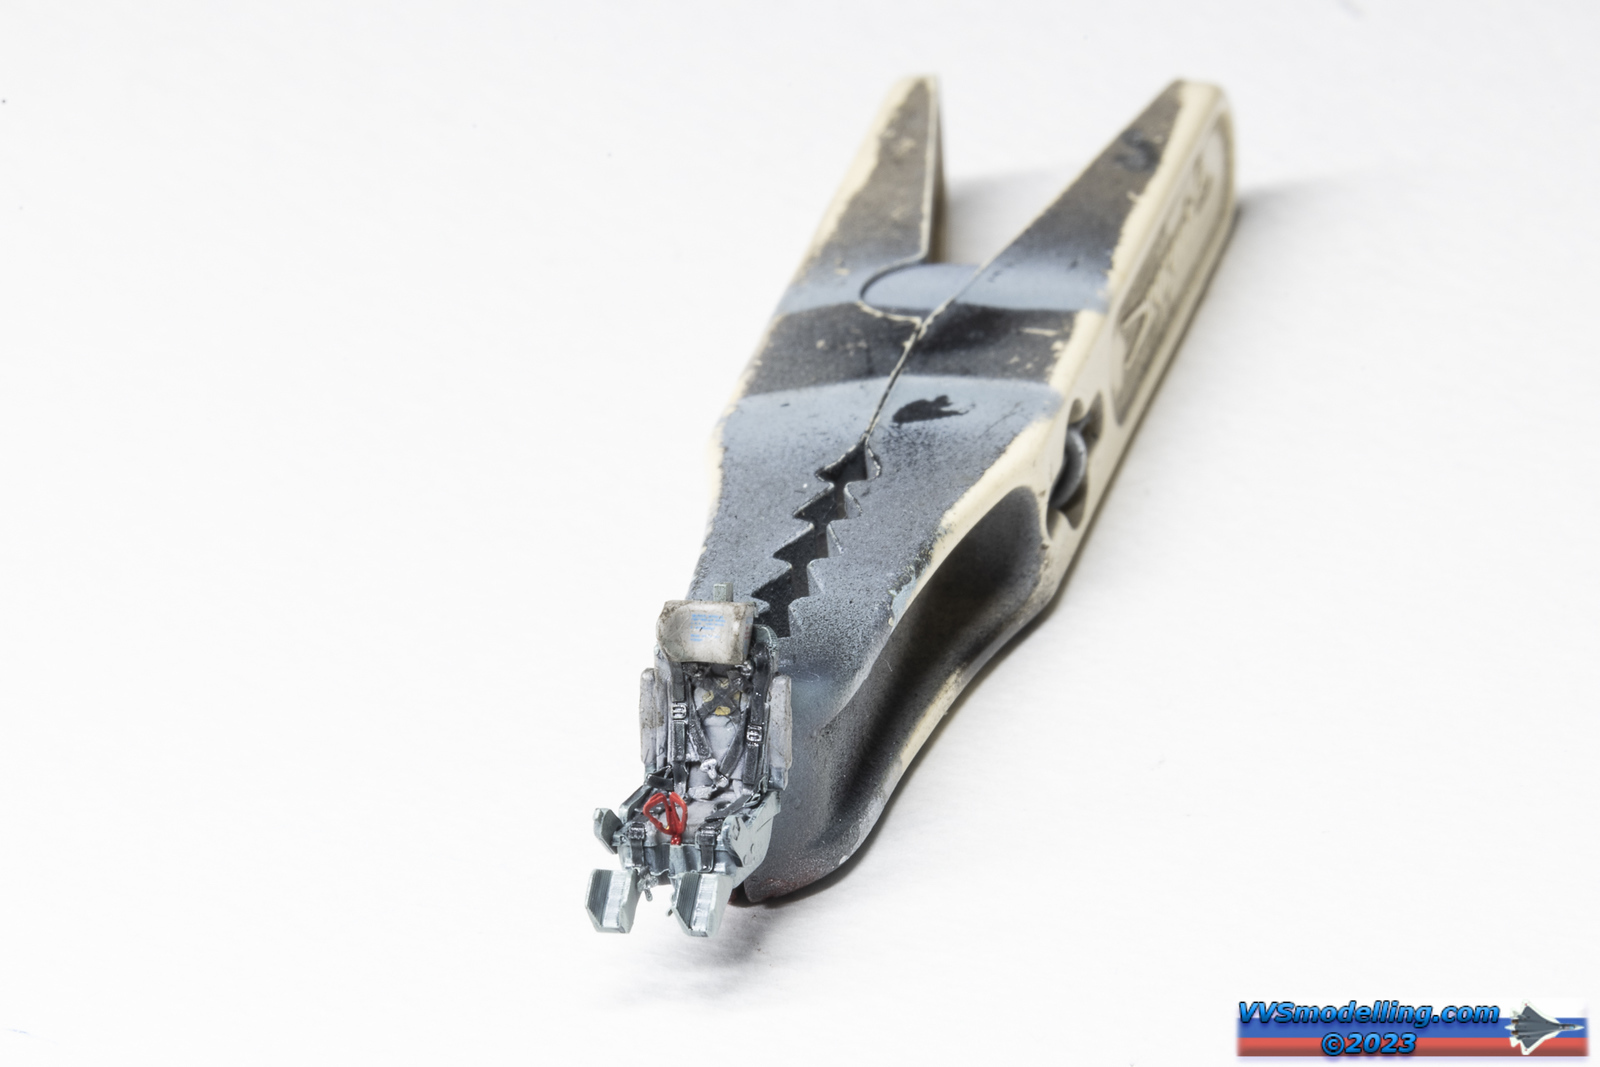
Let’s take a look at the KM-1M ejection seat. As I’ll be doing a 1980s Soviet bird, the seat was painted in blue-grey colour with light grey textile covers, which had a tendency to dirty up during the use.
The kit seat is made out of several plastic parts, photo-etched harnesses and a couple of stencil decals for the headrest.
The footrests were a bit thick, so I sanded them lightly. The trickiest part however is building the main harness. It is made of 3 parts – the central crossed straps plus the over the shoulder straps. Catch is that you actually have to guide certain straps of the central part through the small half-loops on the shoulder ones.
My initial thought was – hey let’s anneal this thing and the brass will be soft enough to make this happen. So I lit the small tea candle and as soon as I approached the flame with the part, it immediately turned bright orange and part of it fell away… WOW! So I tried another one carefully and again the part wanted to deform, but I was fast enough to save it. I am not sure what kind of material ClearProp used for this etching but be aware. I eventually rebuilt the lost part of the strap and somehow covered and bent the rest.

Apart from that incident, painting and weathering went smooth and I got a really nice looking seat in the end.
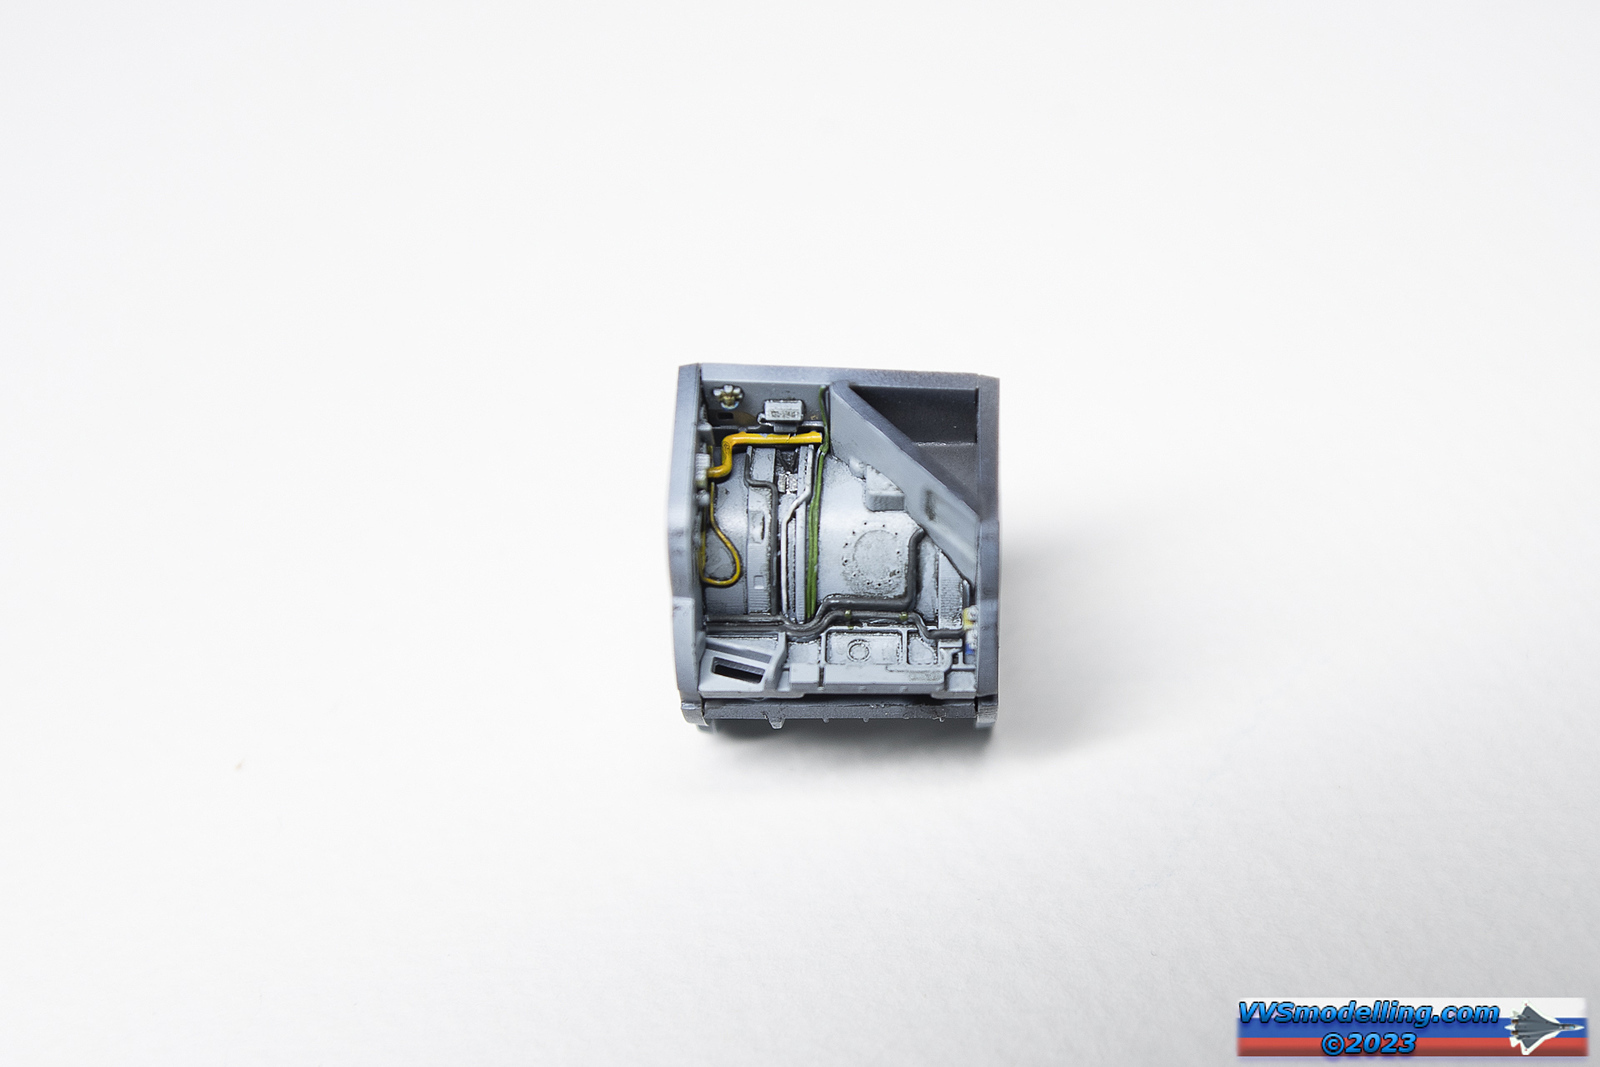
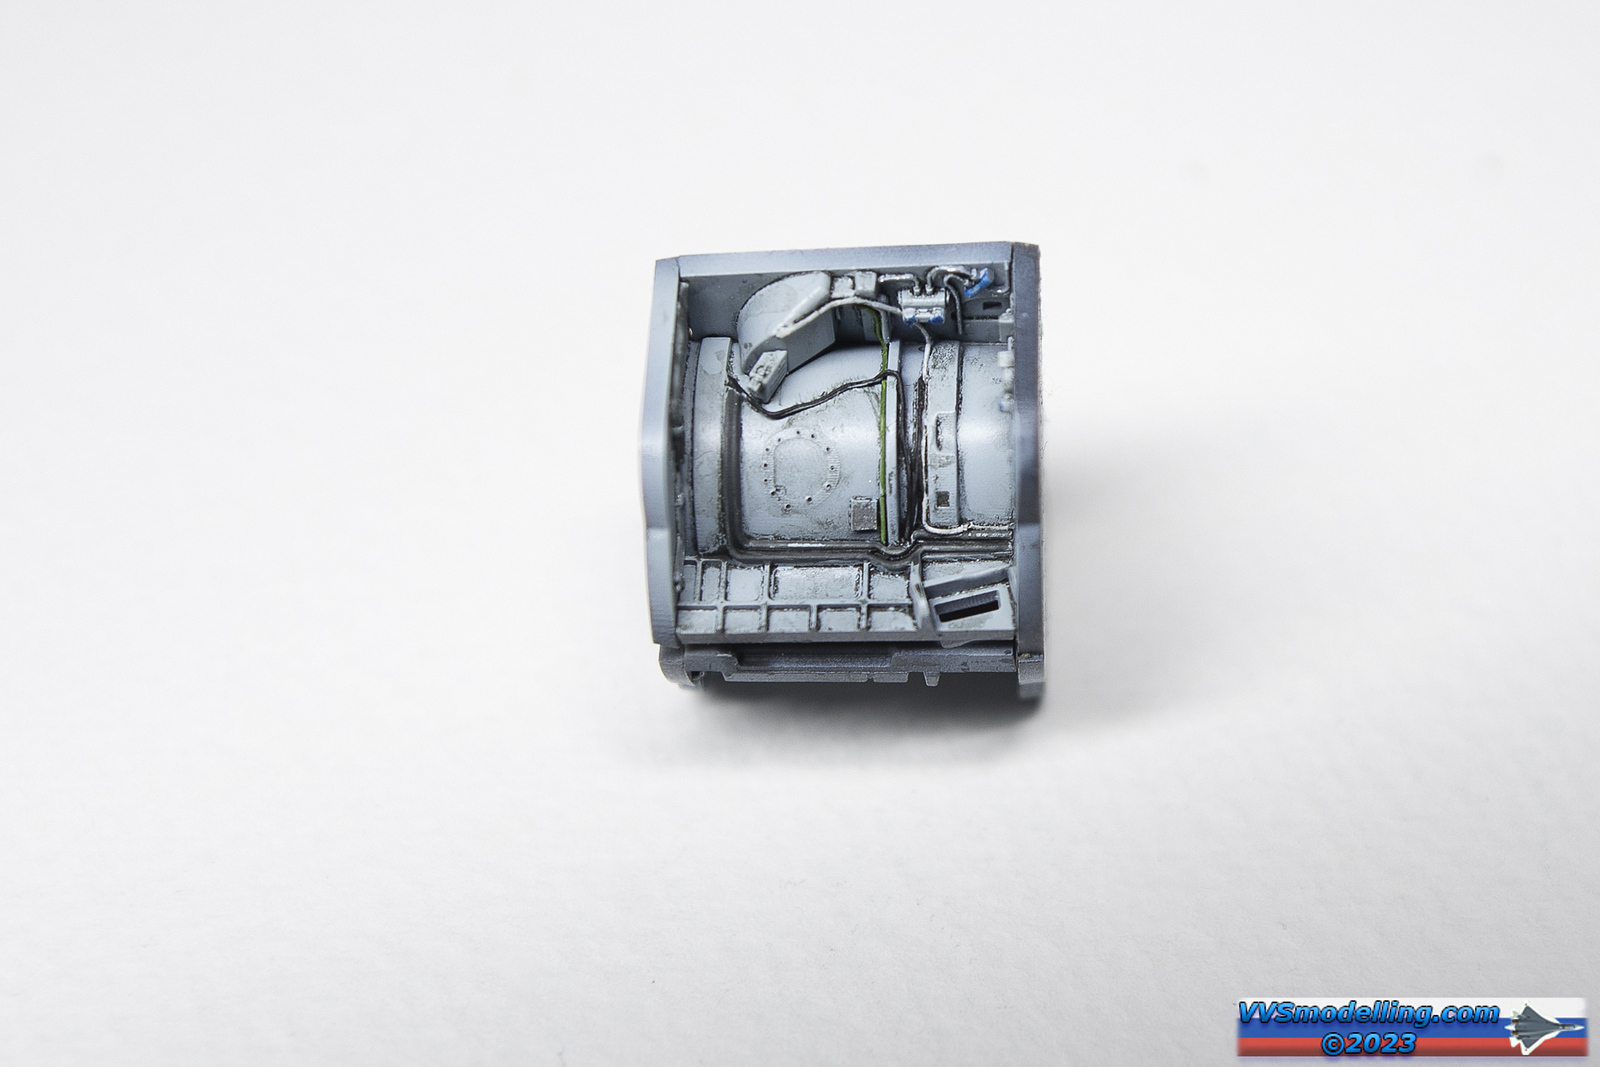
The interior of the exhaust pipe is made of three main pieces. I don’t really like such arrangement as it will inevitably leave three seam lines down the tube, which are next to impossible to remove without loosing detail. And as you can see, the detail is exquisite. Unfortunately the many little holes are not afterburner nozzles as I’ve though initially, but actually green painted domed rivets or something similar. The nozzles themselves are actually even tinier but not represented by the model. The flame holder that you can see are actually made of 3 PE parts carefully bent to get the required 3D shape.


Dryfit of the three pieces showing the nastiest of the seams. I guess it won’t be as noticable when glued and hidden in the dark shadows of the exhaust
Remember my first experience with annealing Clearprop’s brass? Well for this round ring around the inner exhaust nozzle, I just had to use annealing. Armed with slightly thicker piece than with seatbelts and knowing the potential danger, I cautiously approached the open flame with this part and then quickly quenched it in a glass of water. And it worked! No damage to the brass and it became silky smooth to bend in circular shape.

With the whole assembly completed I was really satisfied with the result. The PE made flame holder, fit perfectly as did the inner nozzle with that PE ring. I’ve painted that green and played with oils to give it that scorched burned look – I’ve used White, Starship Filth, Buff and Payne’s Grey oil paints for the effects.

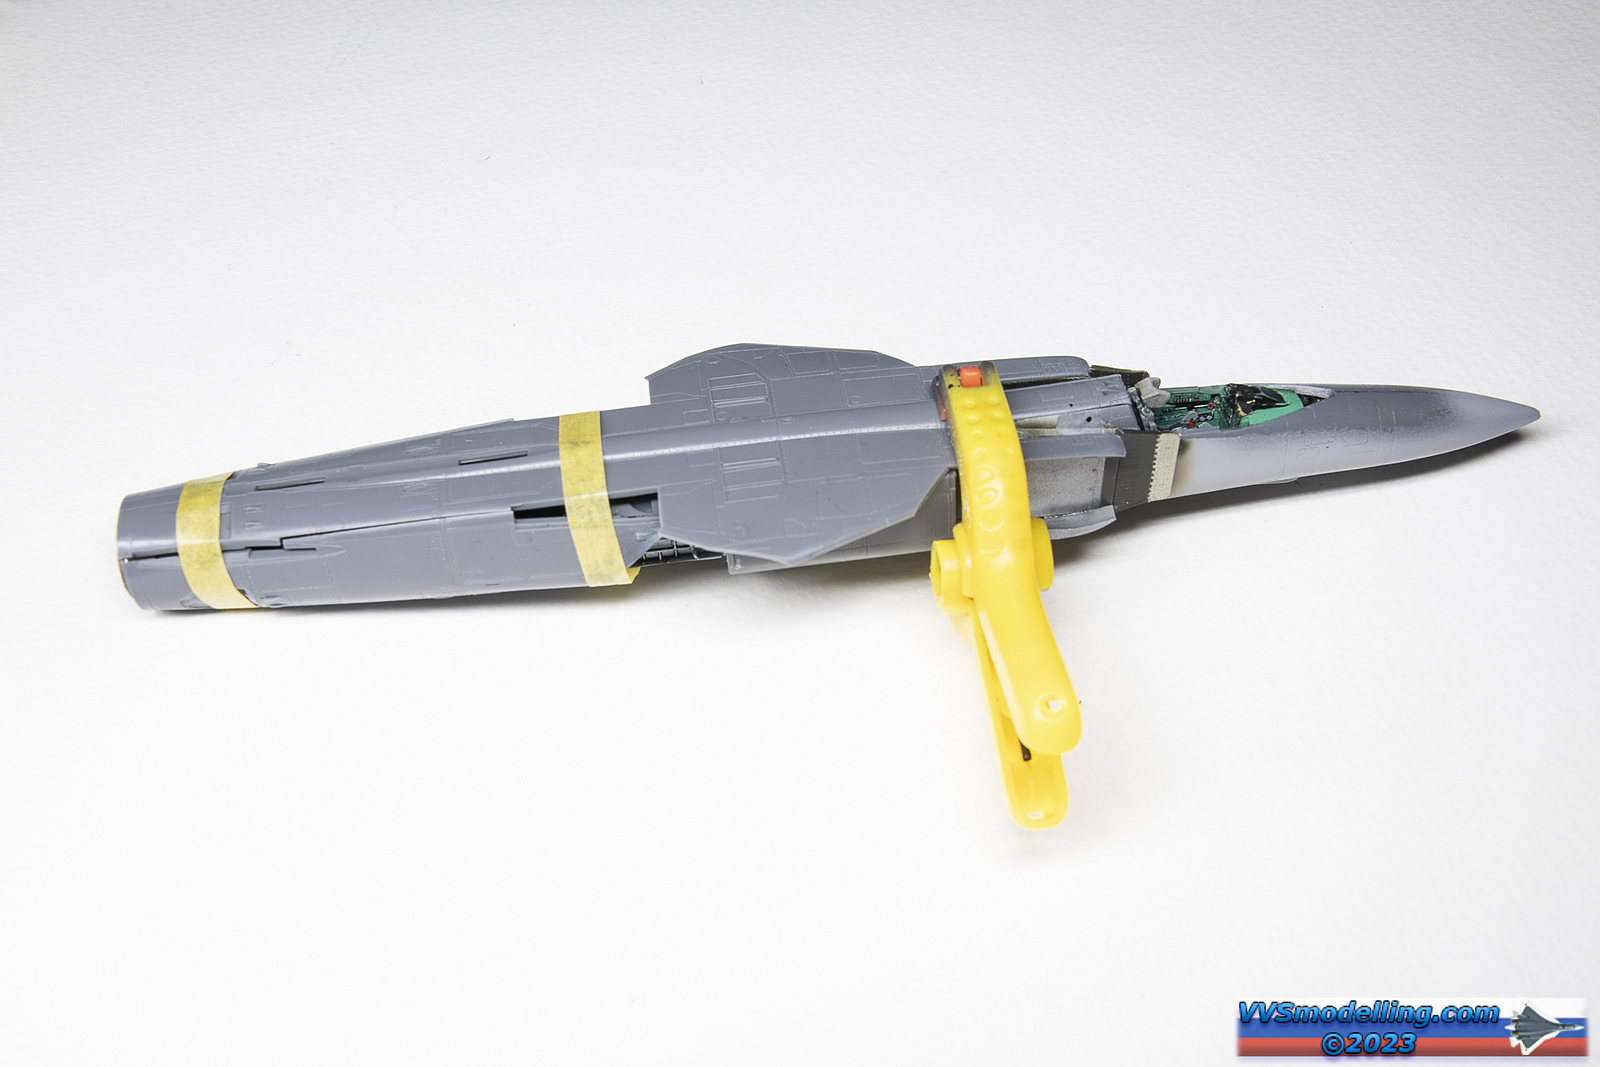
Front wheel well features nice details and goes together really well.


The detailing of main wheel wells is really nice, but due to the limits of plastic moulding, more details can be added. Looks decent out of the box but looks even better with some additional wiring.


Since I will be doing the wings fully swept configuration, the recommended weight in the nose is 10gr. To be honest, there’s not really a lot of place in that nose, so I’ll be combining the usual lead fishing weights with Uschi van der Rosten’s Three Greens product.

Unfortunately as it is apparent from the last photo, the first fit issues start showing up – I cannot get a nice clean joint between the lower part of the fuselage and the fuselage halves – the gap appears almost identical on the other side as well.

By chance I also discovered my favourite new “putty”. Most of you probably know, CA or “super” glue can act as a filler, but most of these glues, when dry, become hard as a rock and are really tough to sand. Here comes the VMS Black CA glue. This thing dries up nicely but unlike other glues, stays relatively soft and thus easy to sand. In combination with the recently acquired DSPIAE curved sander, it’s a combination hard to beat on rounded fuselages. I only have to rescribe the details around those dreaded side gaps.


Since painting the area between the fuselage and the splitter plates is hard to reach when assembled, I’ve decided to paint those areas beforehand. The tip of the splitter plate was masked and painted with Anodized Aluminium.

Now the whole bunch of problems arose – The complex nature of the kits fuselage breakdown caused fit issues. While the sides of the fuselage were somewhat cooperative, the upper part defies a good fit. It is interesting that the pieces over the intakes fit perfectly yet both the central piece behind the cockpit and the rear fuselage behind the wing box appear too long. As it appears, this will now be the hardest part to solve.


I have finally added the wings and the leading edge extensions – wings fit nicely but the extensions again needed putty and filling. The resin exhaust’s fit was also poor – while I managed to attach it, following the upper (most visible) curve it created quite a step at the bottom, which I tried to at least reduce slightly using Mr.Paint’s putty.
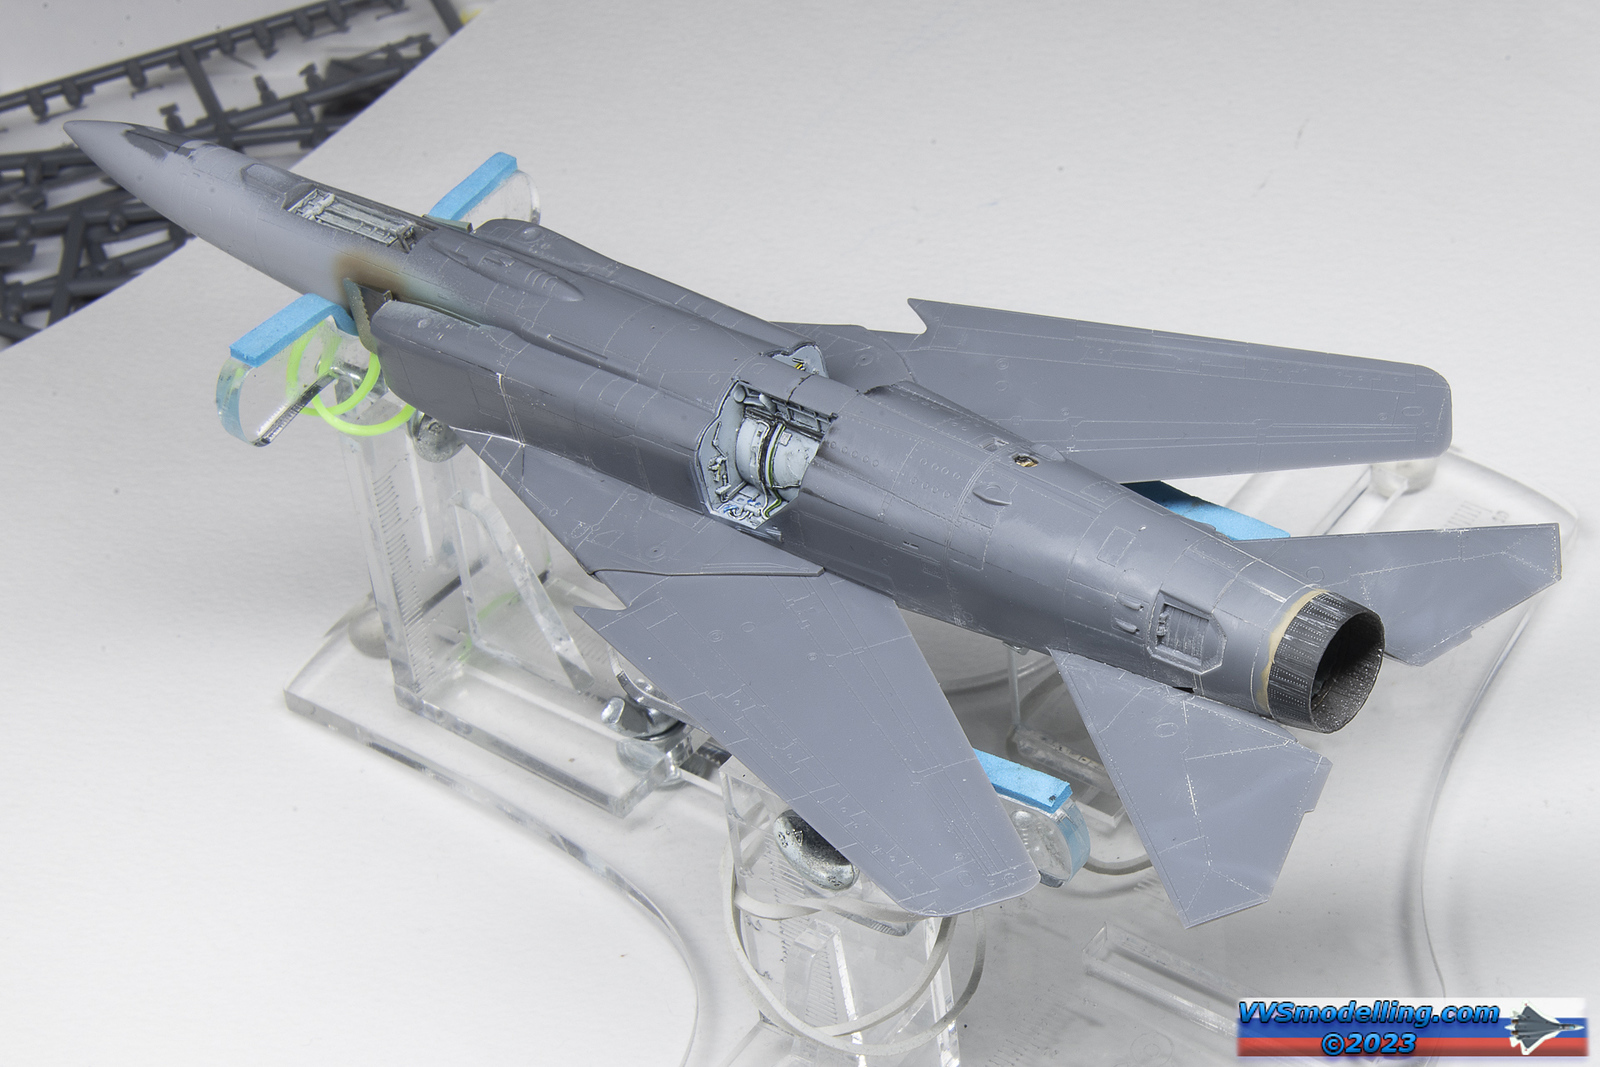


I almost have trouble believing I managed to bring this build to this stage. With all the fitting issues, I was losing my mojo big time and was seriously thinking of just quitting it a few time. But I persevered and here we are! She’s primered up with a coat of Mr.Surfacer and it is funny how all you need is just a coat of grey paint and all the troubles with the build so far, just sort of disappear! Anyhow, fun stuff ahead and I hope modelling gods will grant me troublesome build ahead.


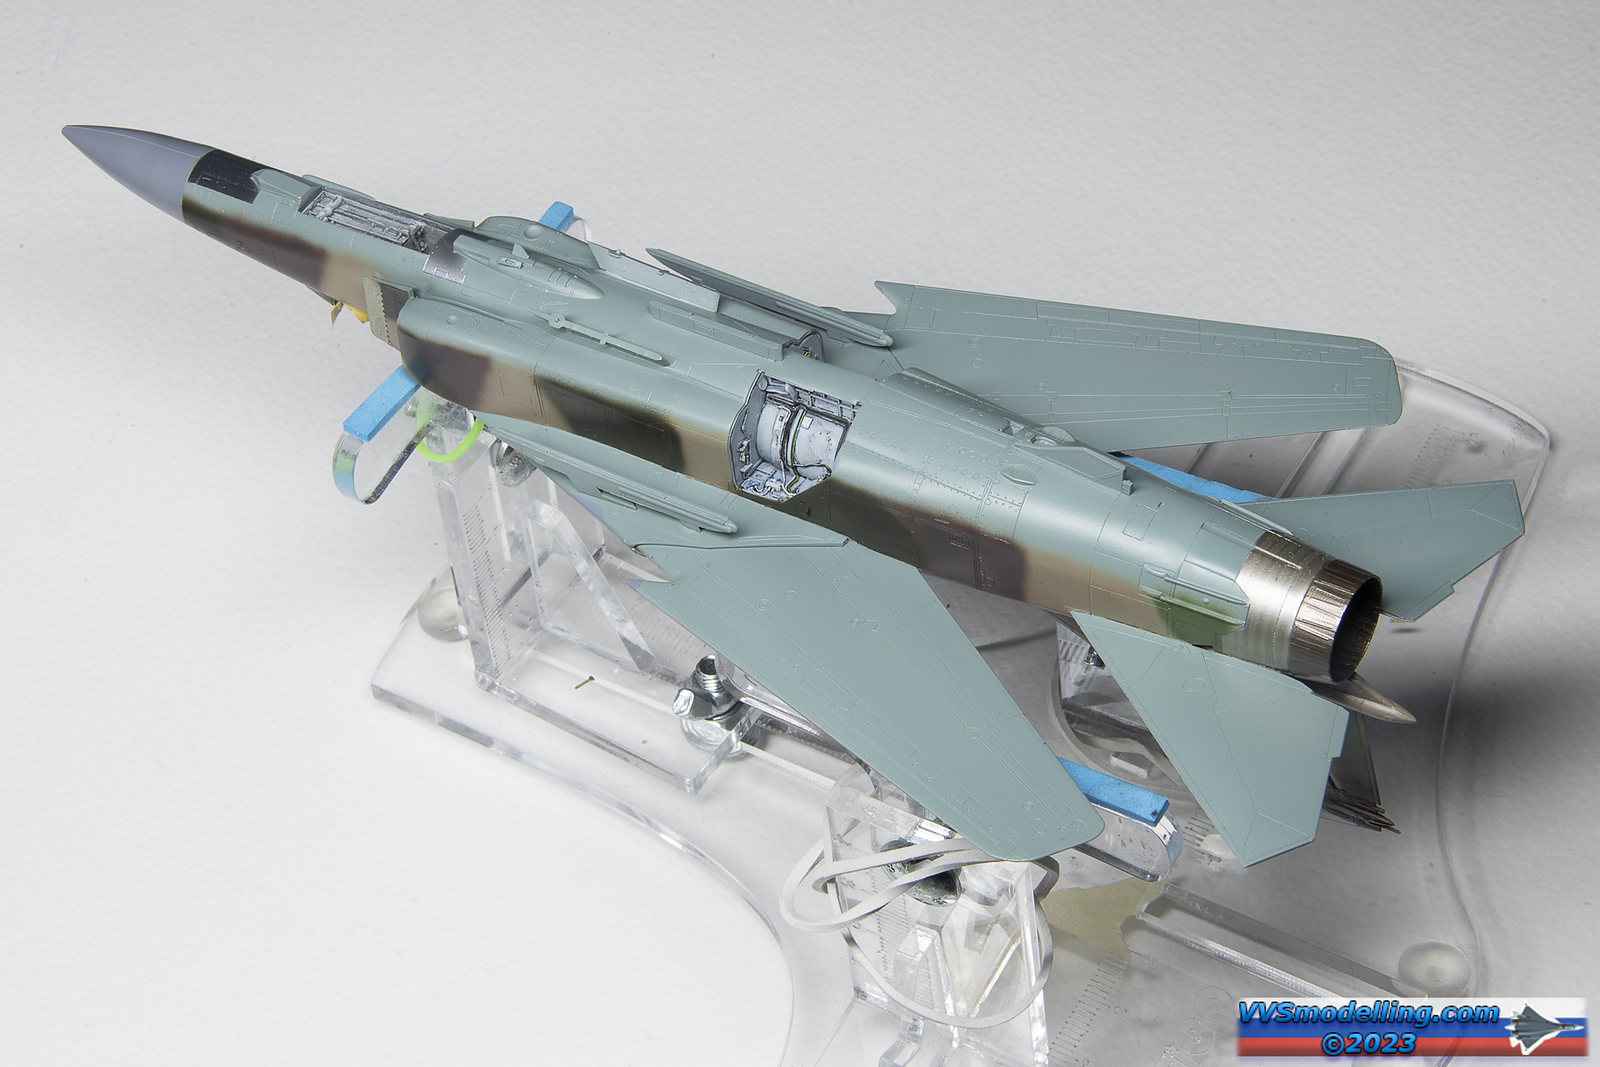
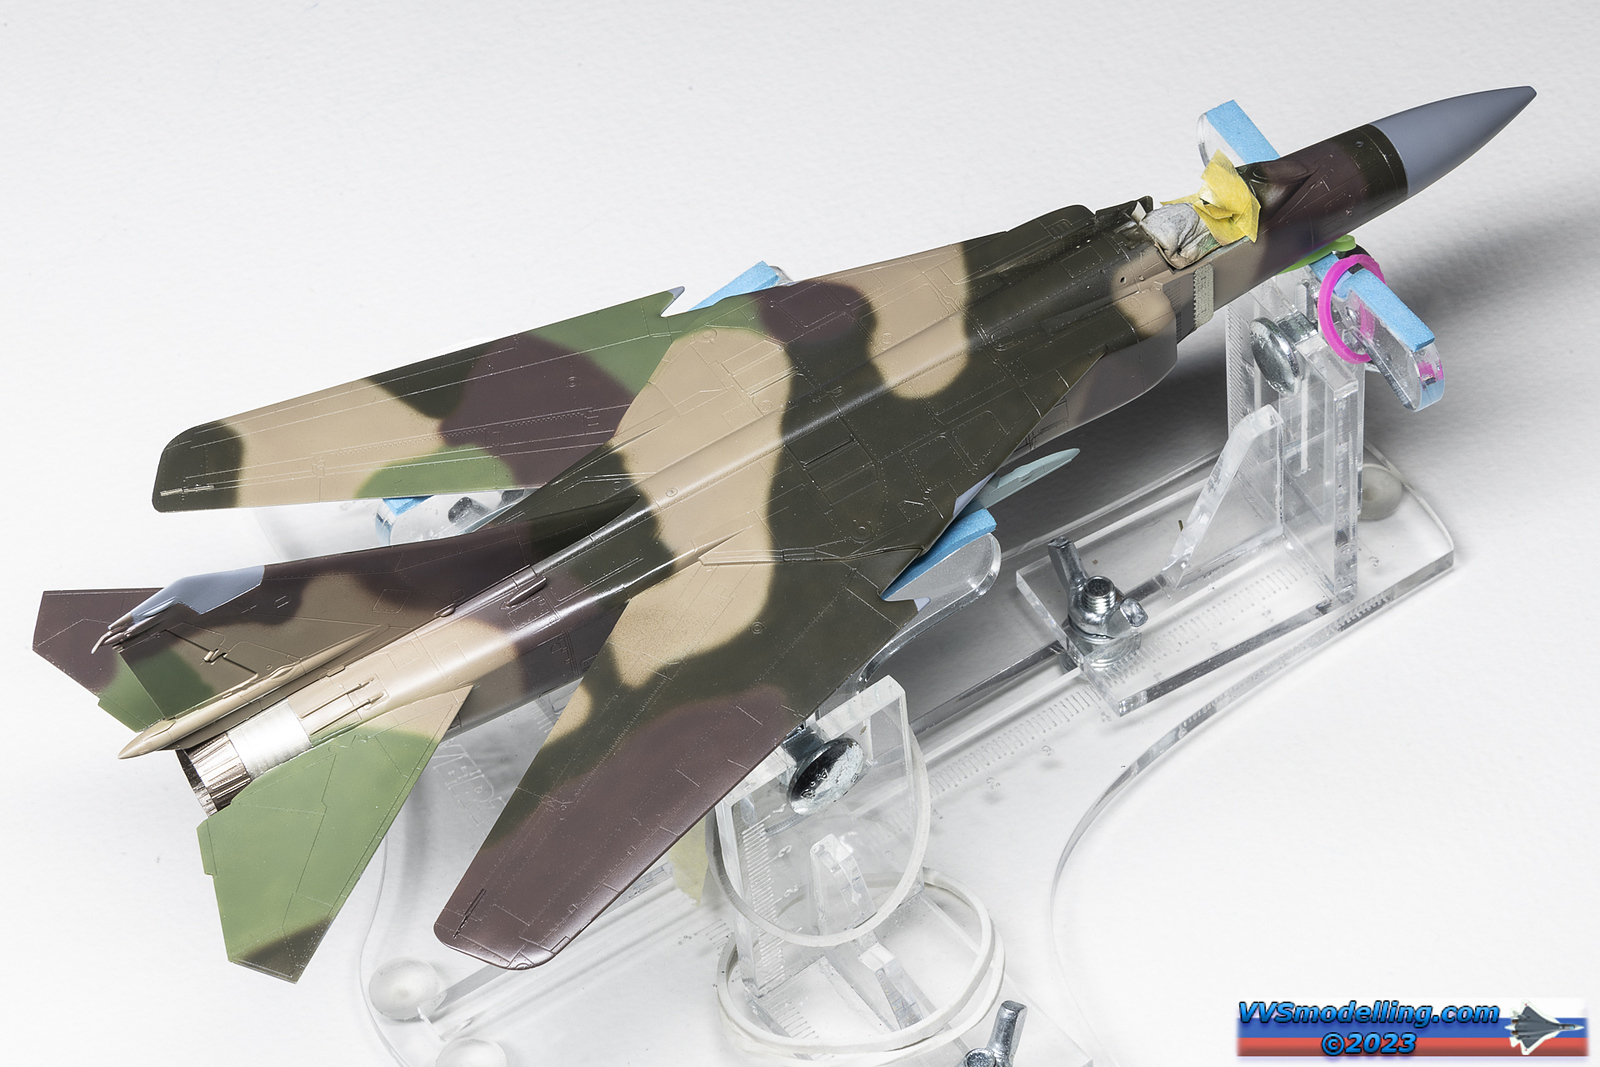
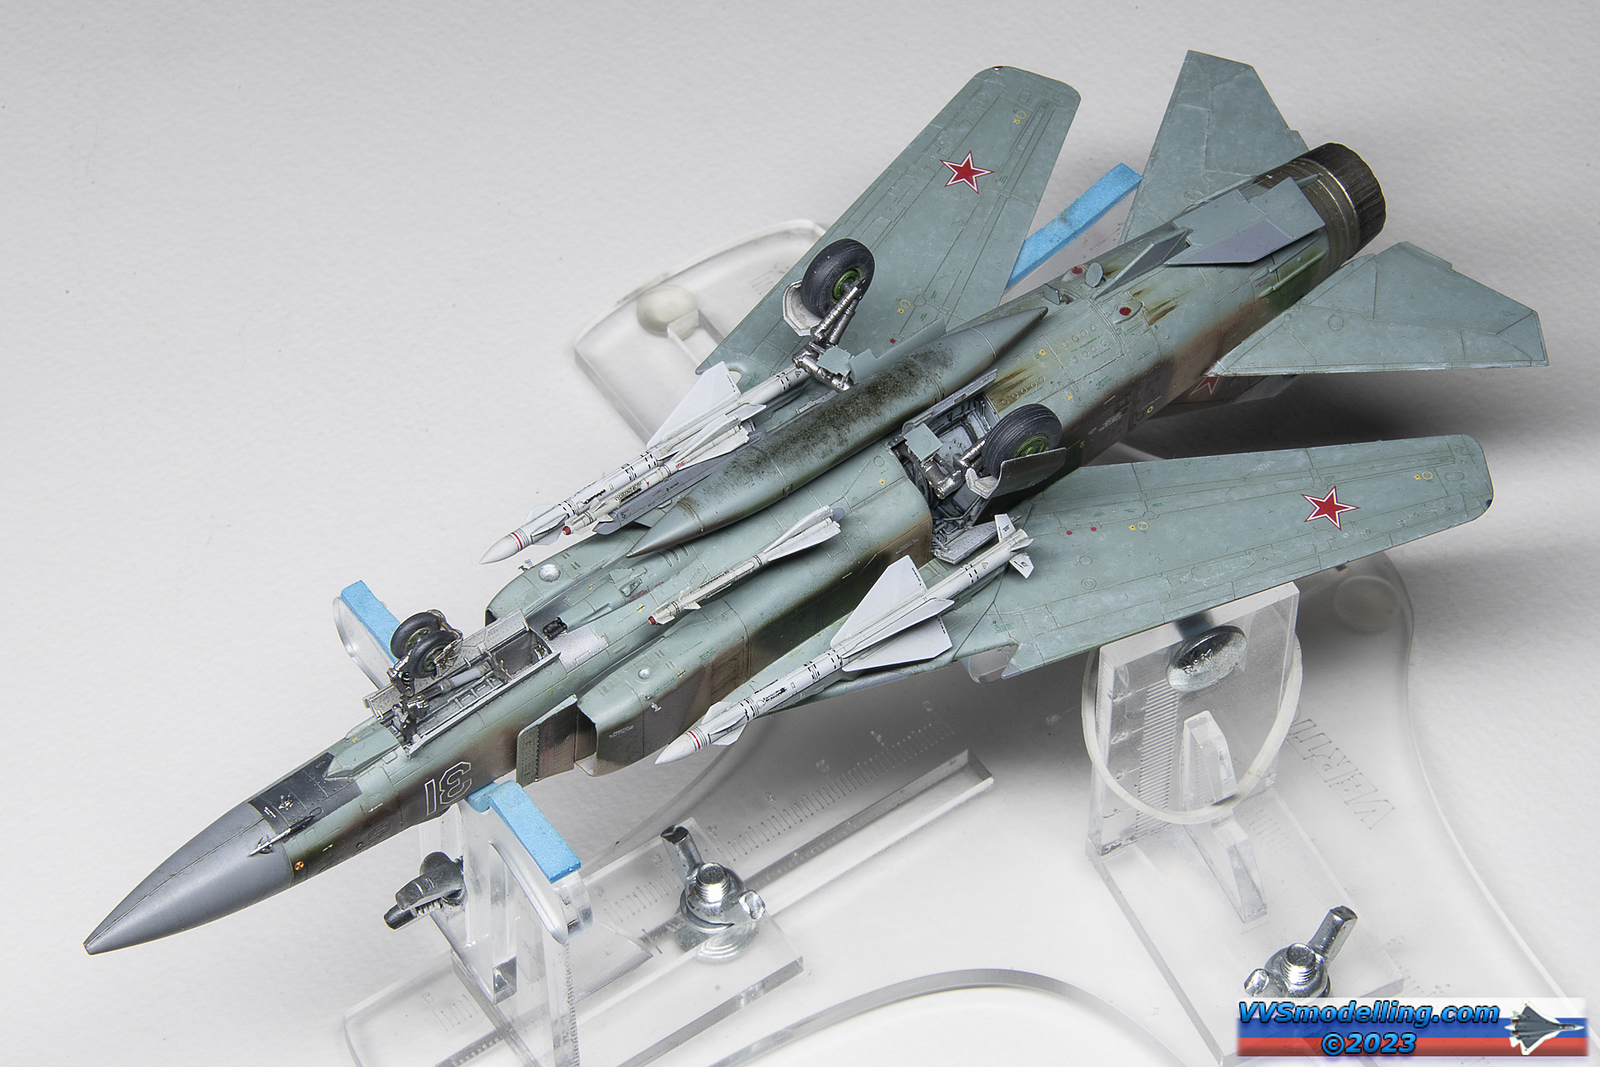
Clearprop provided a plentitude of really nice camouflage schemes with this kit – a Soviet 4-tone scheme, a Czech and Czechoslovak one as well as East German one… And in other boxings attractive North Korean and Cuban ones amongst others. I was kind of on the edge of choosing between Soviet and Czech ones and decided I might do Czech MF sometime in the future and so I went with the Soviet option of “white bordered 31” from the 821st IAP. The camo was free hand painted using my trusty old Harder & Steenbeck Airbrush Evolution Silverline with MR. Paint lacquers as usual!

Decals for this kit were printed by Decograph. The printing is great, vibrant opaque colours, no offset noticed and the resolution is also high – the tiny stencils are almost readable. The carrier film is really thin which is good and bad – when they go down they just become one with the surface without the need for decal softening solutions. The bad side is, that they have a nasty tendency to fold on themselves. It is not a big problem with the larger decals like bort numbers and stars, but applying stencils was quite a challenging job and I have to admit, there are several missing because of that. I also experienced a weird thing with a few of them – they wouldn’t release from the backing paper completely – they would cling to the paper at one tiny point and trying to move them around, just stretched the decal film like it was made out of rubber but to no avail. Luckily there was just few decals that were causing me such problems and after a couple hundred or so, I guess I can be excused missing a few
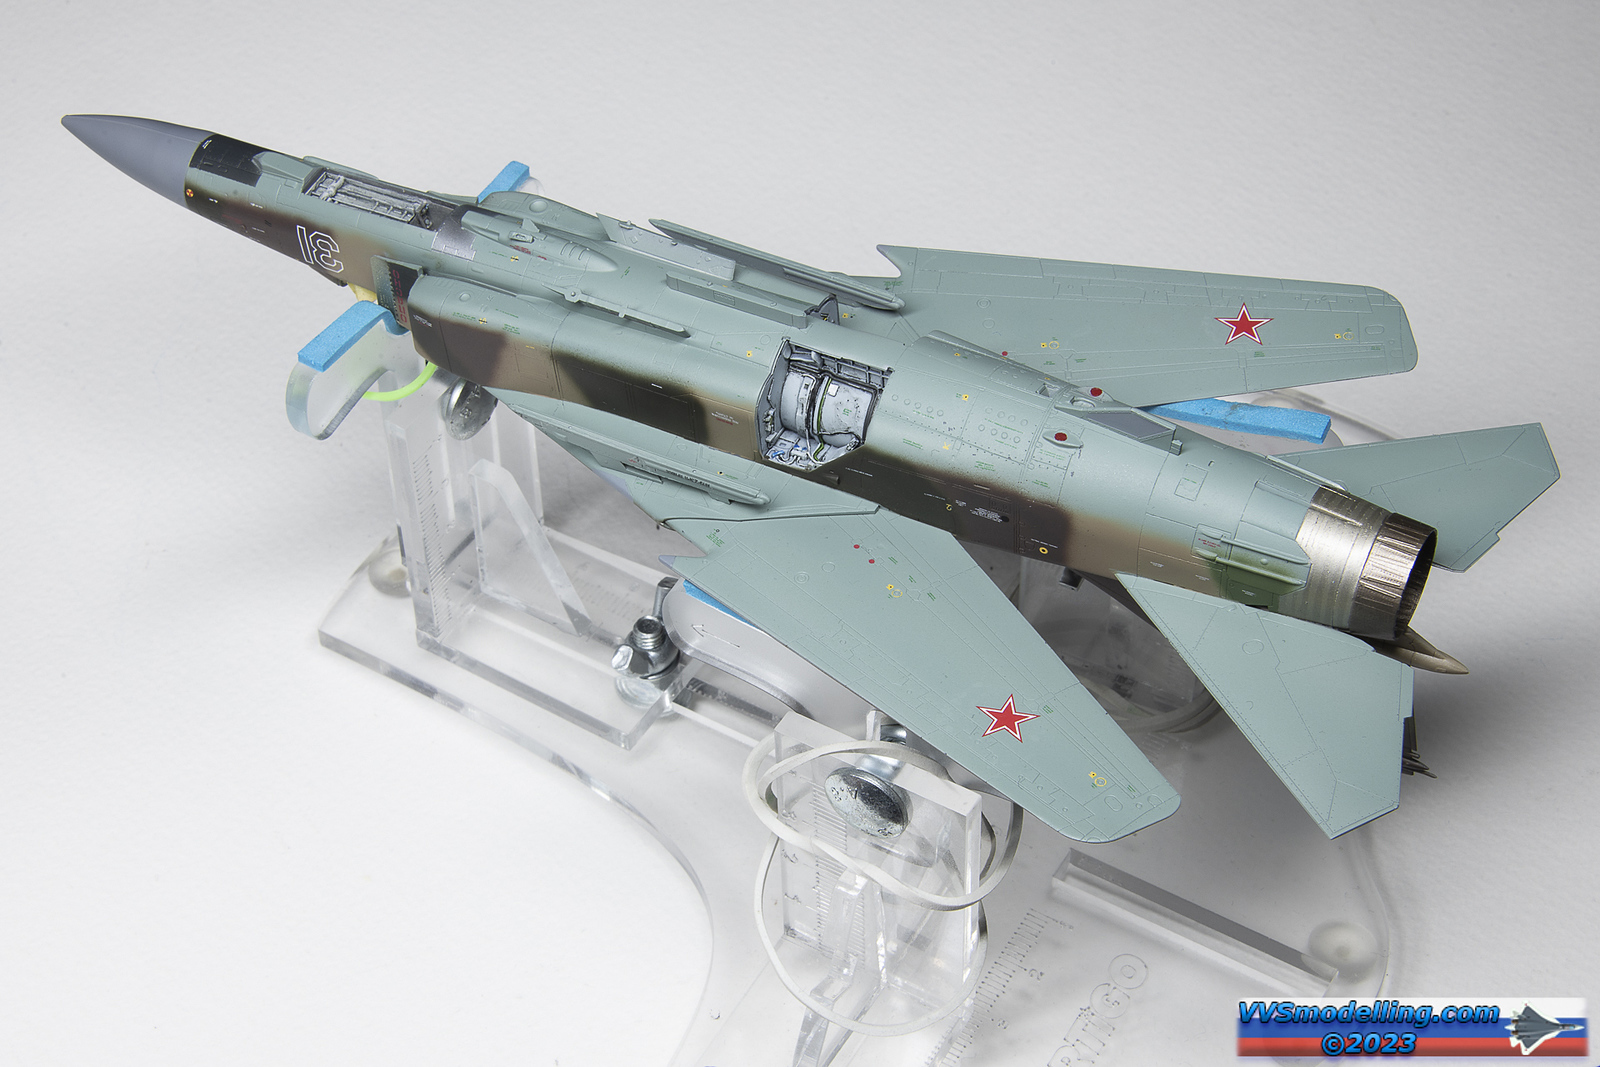
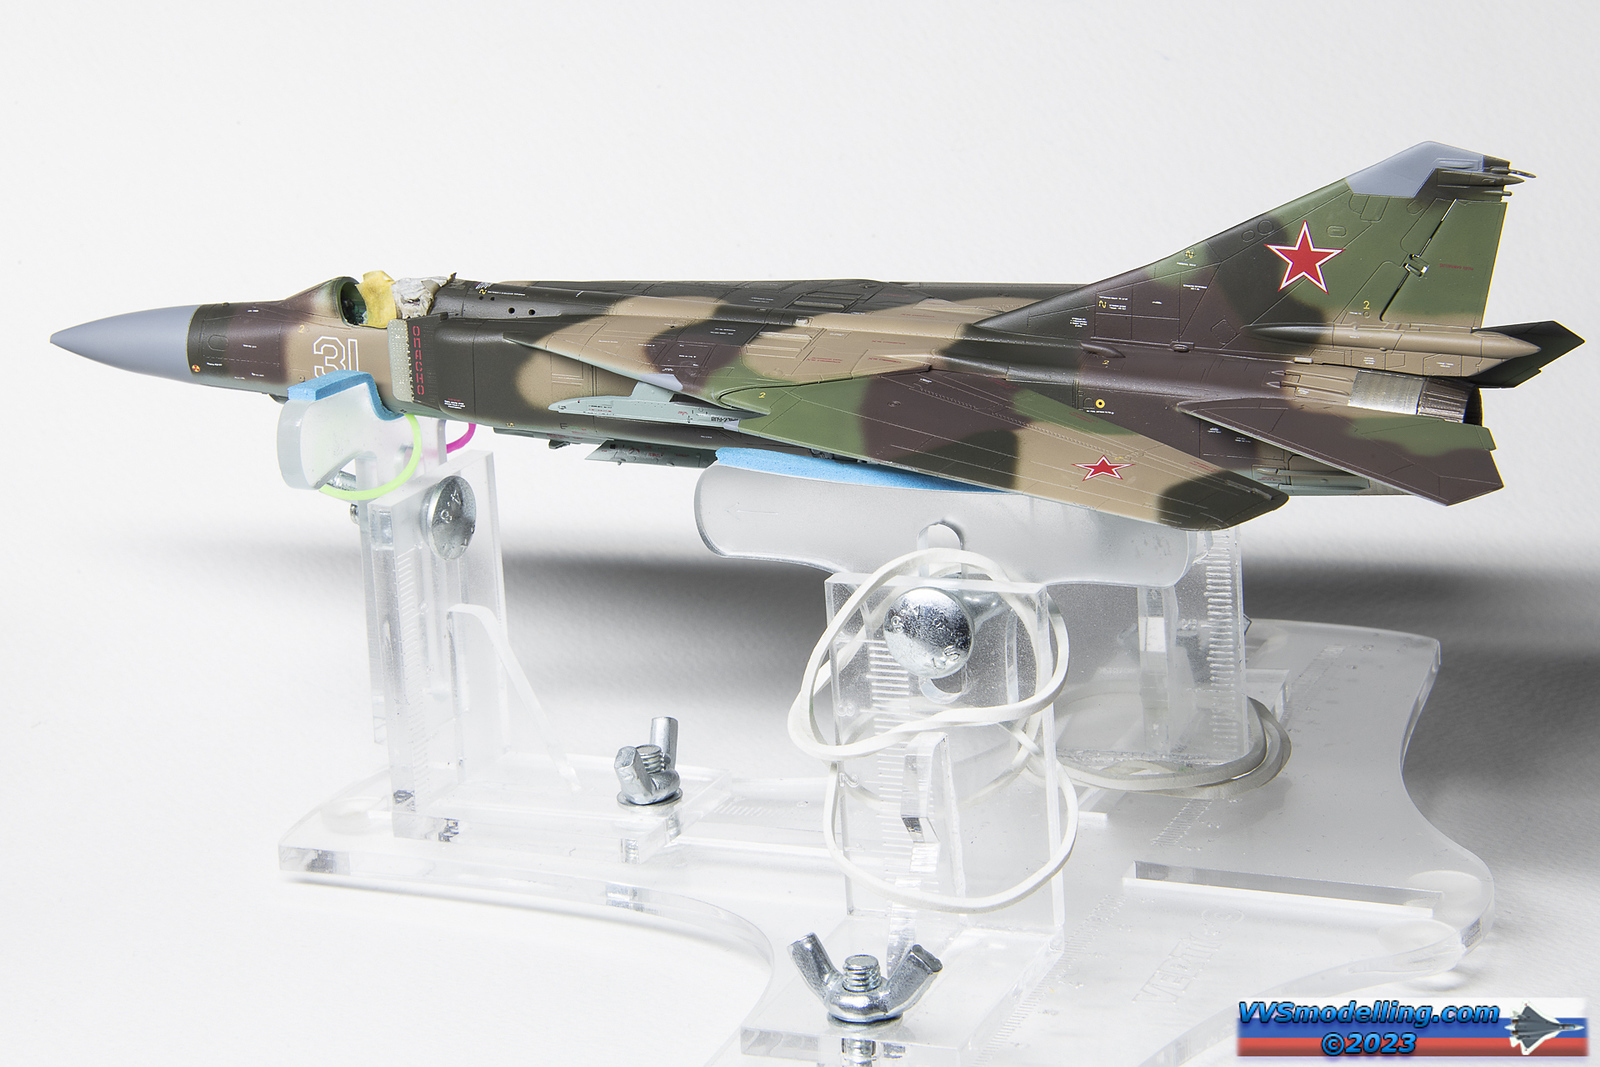


With decals applied and everything sealed in with an excellent VMS Satin Varnish it is time to play with oils. If you are following this build from the beginning you might have noticed that I didn’t use any of the preshading or black basing I would have normally used. That is, because I decided to create all the weathering and paint fading using oil paints. I admit it is a time consuming job that takes time and patience but at the same time gives you total control over the final outcome. I am using Abteilung502 and Oilbrusher paints combined with VMS Universal Weathering Carrier as a thinner.


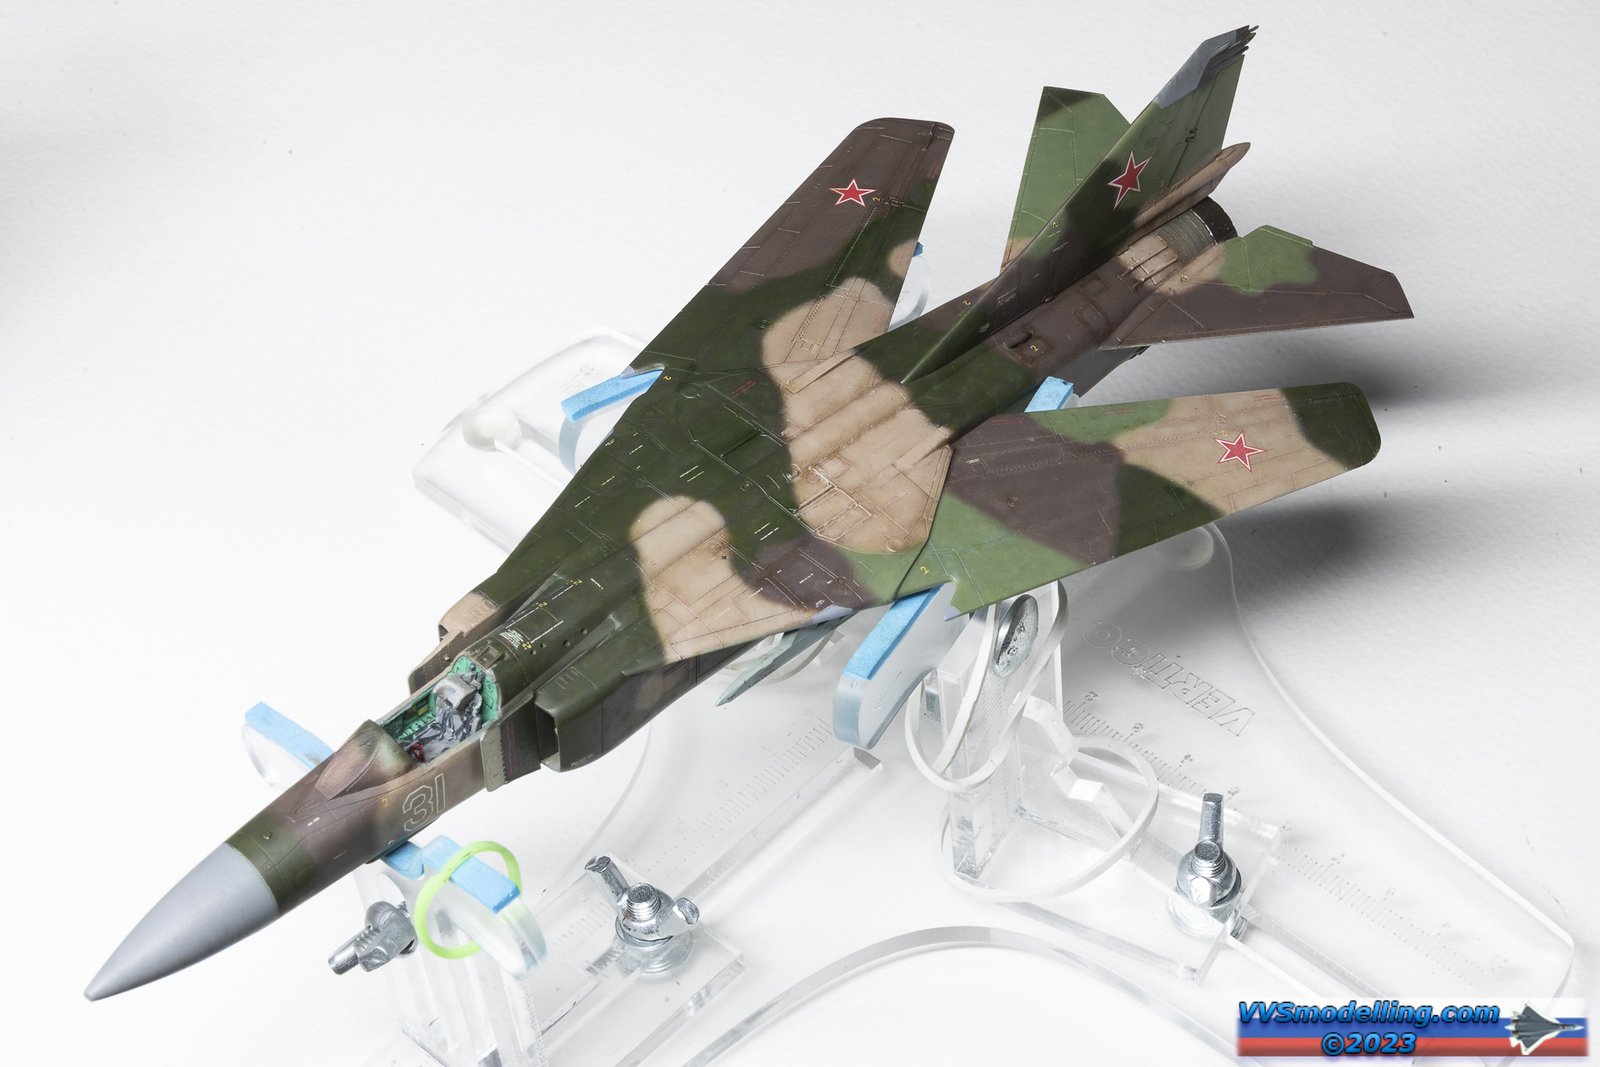
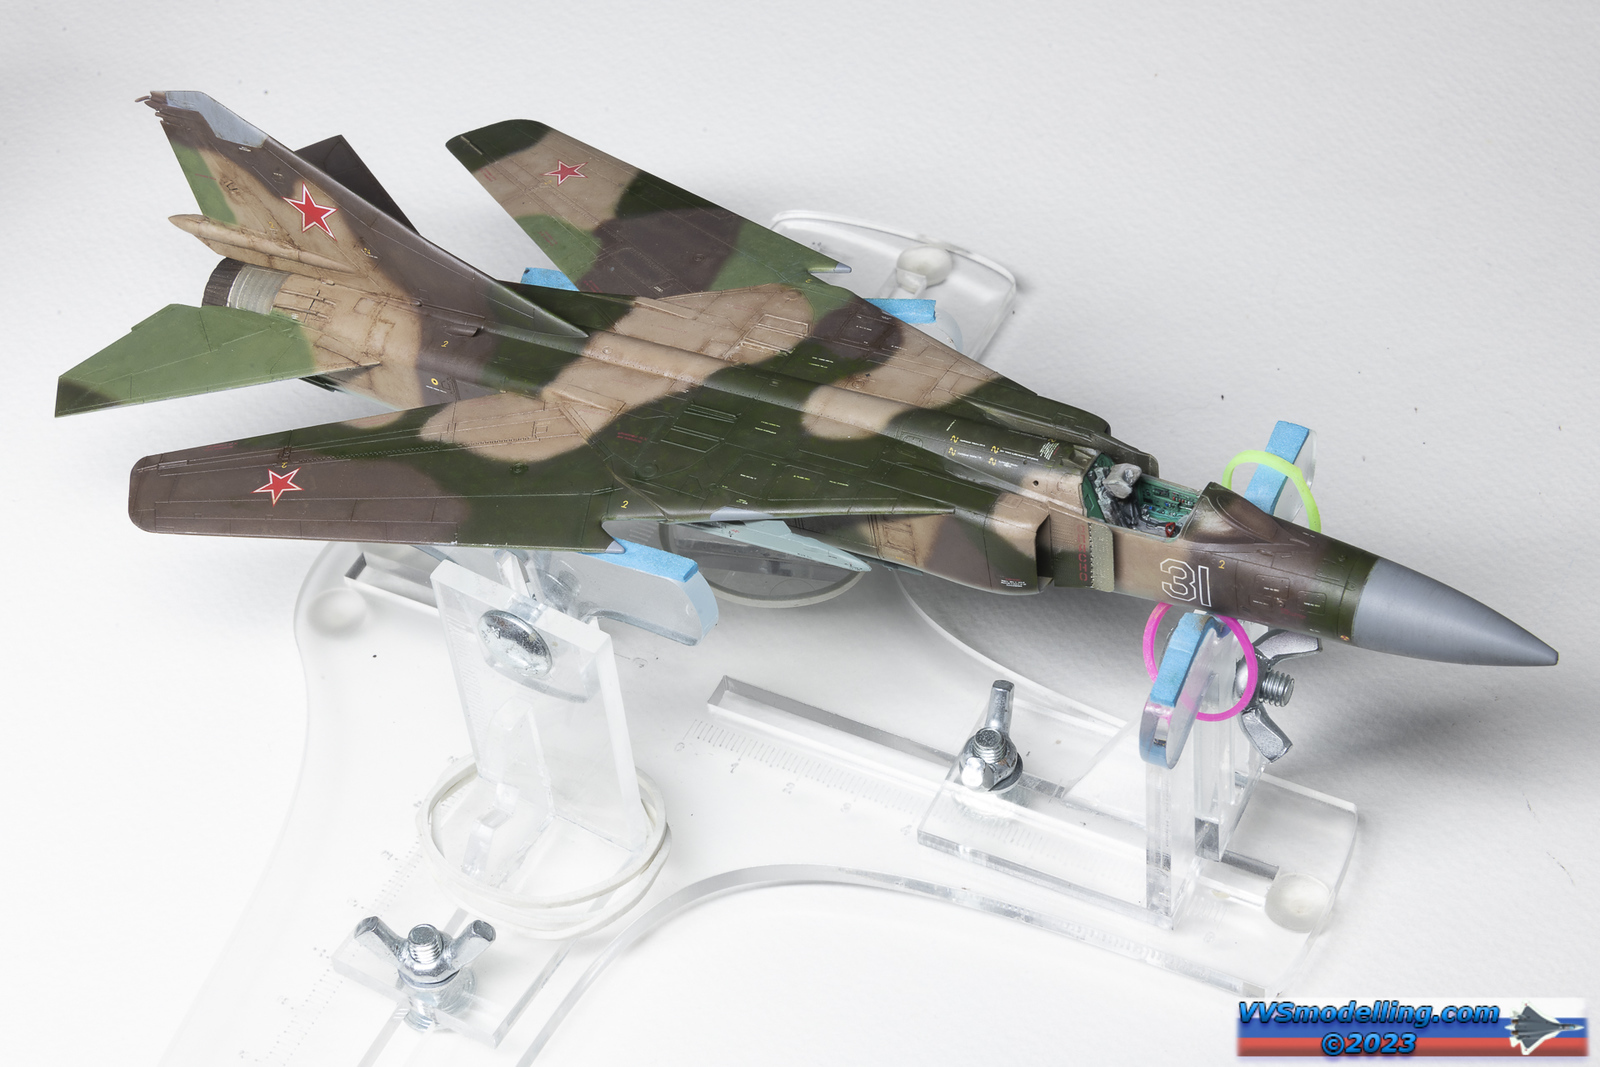
I liked the previous result of the oil paint rendering and though I could push it even further for more fading. Even though it is time consuming, I am really starting to love this technique.
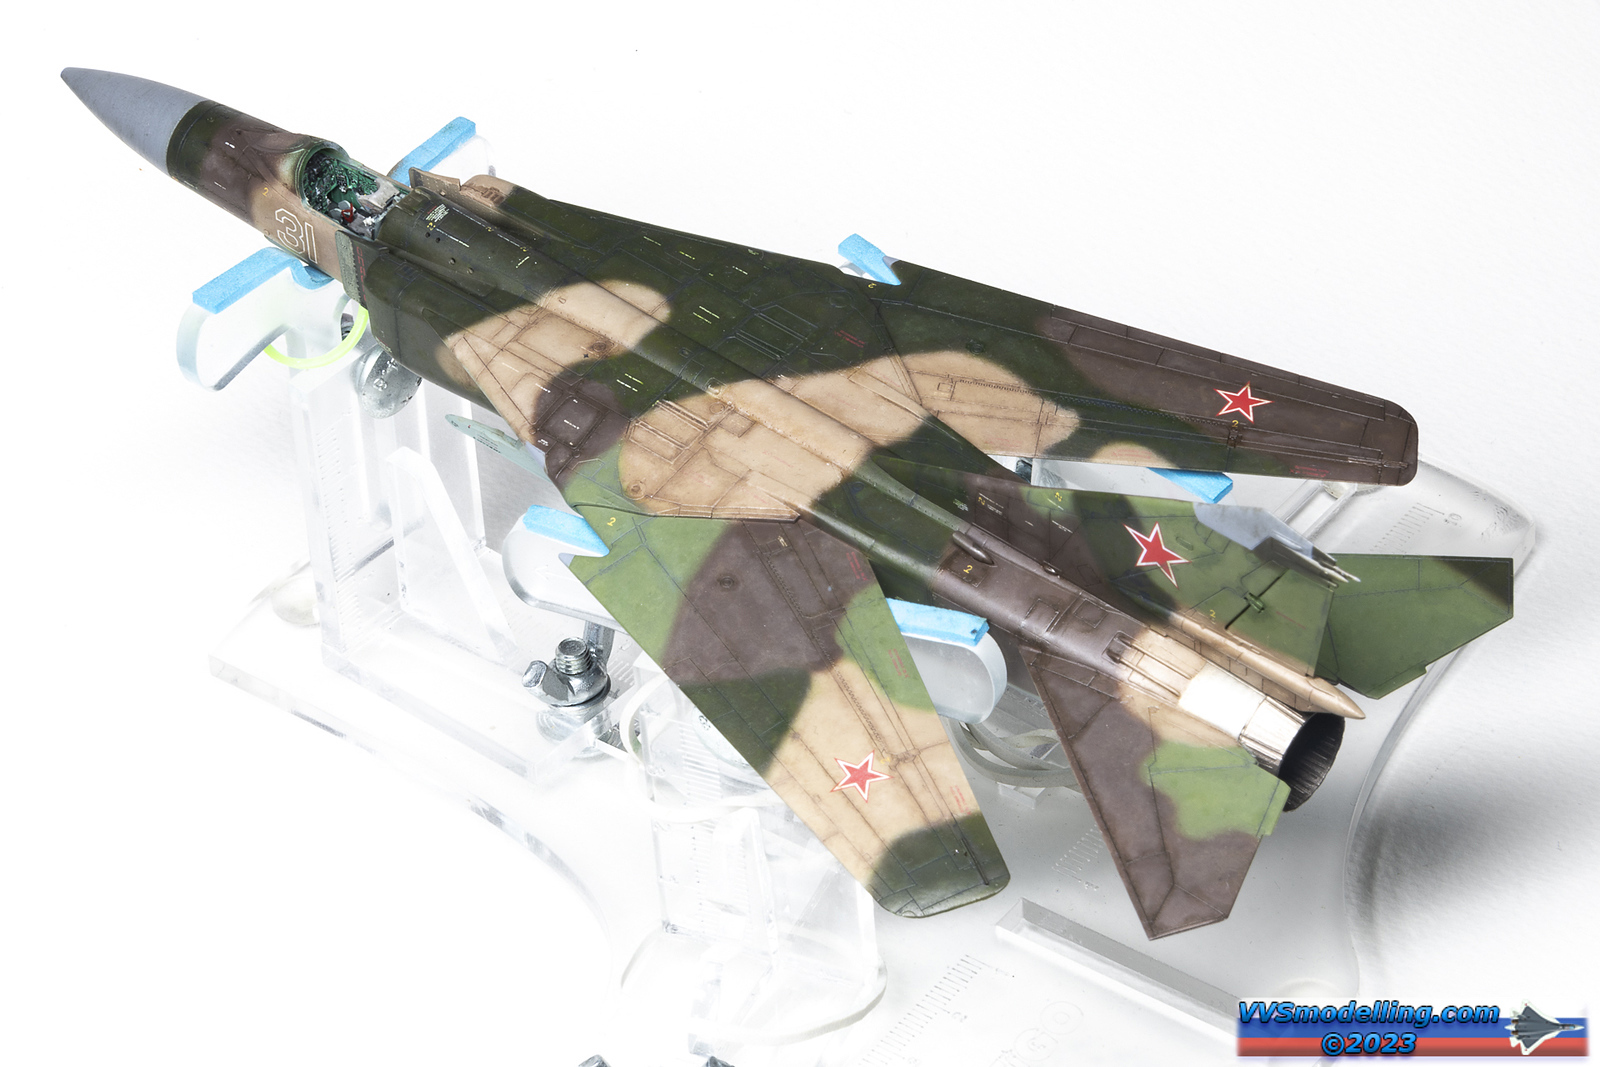
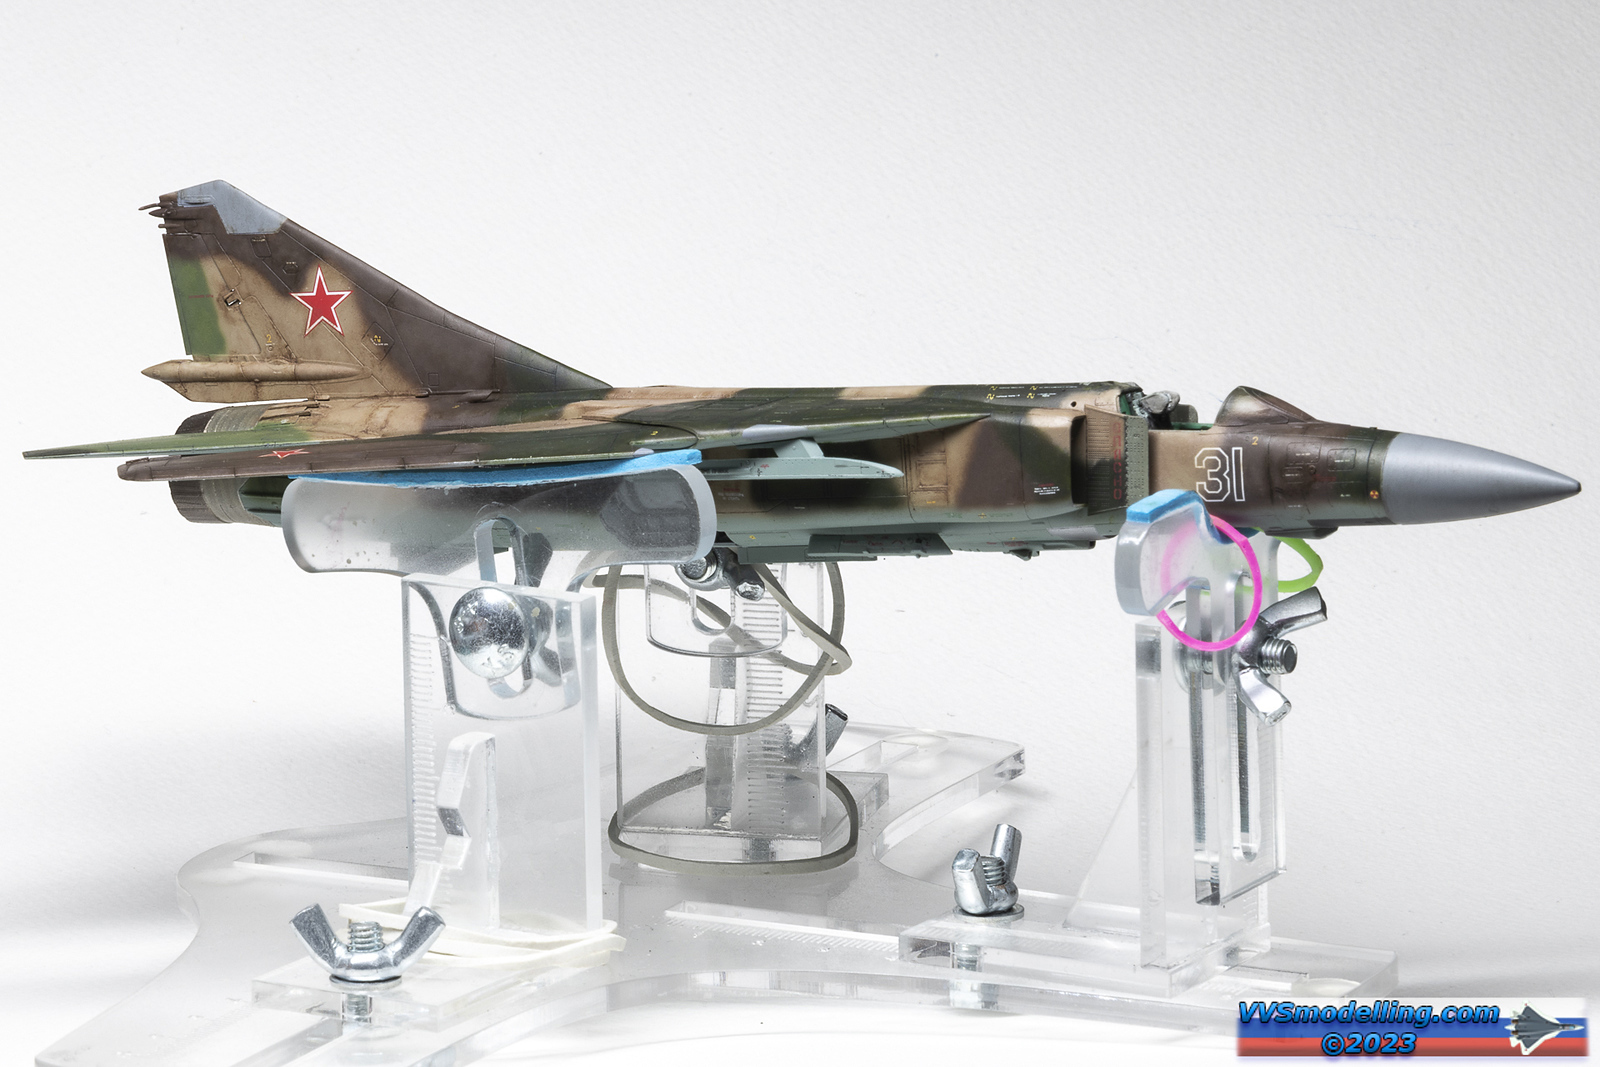

Again playing with oil paints, I’ve faded and distressed the plain look of pale blue grey undersides… Some streaking was added and as you can see, the wheels assembly has started.


Weapons:
missiles are a nightmare to build – nothing wrong with them, really, but just for example, the little R-60s are made out of 13 parts each plus over 20 stencil decals. The larger R-24s are a little better construction wise, but again many decals slows the build down. They look good though in the end!
Landing gear:
It is a complex affair on the real aircraft and the same goes with the model. While the gear struts have nice secure locating positions, great care must be taken attaching all the landing gear covers and their associated actuator arms.
Wheels:
I have to say I am very disappointed in this area. The plastic ones look good, but I’ve decided to up the ante a bit with Clearprop’s resin ones, just to get that little bit more of detail into the build. Unfortunately that was a mistake. Resin has shrunk during curing and the separate wheel hubs were of smaller diameter than the holes in the tyres; I managed to hide the resulting gaps a bit with the main wheels, but front ones were unusable and I ended up using plastic ones. Also the locating holes were of smaller diameter than the plastic pegs on the struts, while the main struts have a “key-hole” like peg, that enables correct positioning of the hubs, but the resin ones have just a hole and you need to modify the parts.


Great work indeed. Oils always achieve an stunning and vibrant result. Inspirational indeed. I’ m considering this kit, despite the tricky assembling. Awesome result, congrats. Greetings from Madrid.. Ernest
Muchas gracias, Ernest!
With all the fit issues, I guess this kit isn’t recommended for the average builder?
Well, definitely not for a beginner modeller, as it requires a lot of effort to be build properly. I guess average (quite a vague term) modeller could build it, but would need to invest a lot of effort and consequently time into the build.